Materials: Item numbers and offerings may vary internationally. Check with your local Qualatex distributor for availability.
2 39″ (99cm) “Golden Bubbly Wine Bottle” Microfoil® Shape98216, 98219 (pkgd)
1 24″ (61cm) “Deco Bubble – Gold Confetti Dots” 89727
8 12″ (30cm) Diamond Clear QuickLink® Balloons 6527316 11″ (28cm) “Confetti Dots” Diamond Clear Latex Balloons
55450, 56844 (Europe)
9 11″ ChromeTM Gold Latex Balloons 58277
8 11″ Onyx Black Latex Balloons 39868
1 11″ “Simply Hello 2020” Diamond Clear Latex
Balloon 90272, 97327 (Europe)
44 5″ (13cm) Onyx Black Latex Balloons 43548Clik-Clik® Stretchy Balloon Tape 32119
Black Curling Ribbon (optional) 25904
Scrap 260Qs
2 Pyramid, Sand or Water Weights
Instructions:
1. Use a thin straw to insert four 11″ Onyx Black latex balloons into four 11″ Diamond Clear “Confetti Dots” balloons. Air inflate the double- stuffed balloons to 9″ (23cm) and create a 4-balloon cluster.
2. Air inflate four 11″ Chrome Gold
latex balloons to 7″ (18cm), and create a 4-balloon cluster. Tie this into the 9″ cluster using one of the necks of the balloons. Tie a weight into the bottom of this cluster.
3. Air inflate one 39″ “Golden Bubbly Wine Bottle” Microfoil balloon and roll tie the neck using a scrap 260Q. Tie this into the base created in Steps 1-2.
4. Use Clik-Clik® Stretchy Balloon Tape and a scrap 260Q to create an attachment point (See Making a Connection Point on the left.) at the top of the 39″ Microfoil.
5. Repeat steps 1-4 to create a second base.
6. Double-stuff eight 11″ “Confetti Dots” Diamond Clear latex balloons into eight
12″ Diamond Clear QuickLink® balloons.
7. Helium-inflate four double-stuffed QuickLink balloons to 11″ and tie end-to-end to form a chain. Attach one end of the chain to the attachment point at the top of the bottle. Repeat steps 7-8 to create the second side of the arch.
8. Using the 5″ Onyx Black latex balloons, air-inflate eight 4-balloon clusters to 2.5″ (6 cm). Place these clusters in between the connection points on the QuickLink chain.
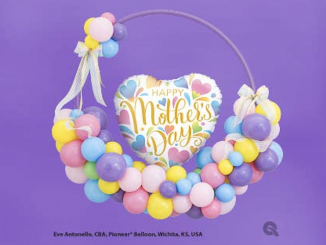
9. Insert an 11″ Chrome® Gold latex balloon into an 11″ “Simply Hello 2020” Diamond Clear latex balloon. Insert this inside the 24″ Deco Bubble. Helium inflate the double-stuffed latex balloon to about 11″. While holding the neck of the latex balloon closed, helium-inflate the Deco Bubble until the seams are free of wrinkles. Twist the neck of the Deco Bubble and latex balloon several times, making sure the double-stuffed latex is centered, then tie off tightly using a scrap 260Q.
10. Using Clik-Clik Stretchy Balloon Tape and scrap 260Qs, create an attachment point on both sides of the Deco Bubble along the seams. Make sure the connection points are level and positioned slightly below the middle of the Deco Bubble.
11. Using the 5″ Onyx Black latex balloons, air-inflate three 4-balloon clusters to 2.5″. Wrap one of the clusters onto the neck of the Deco Bubble. Add curled ribbon if desired.
12. Tie the end of each QuickLink chain into the connection points.
13. Attach remaining clusters made in Step 11 to each side of the Deco Bubble using the attachment points.
14. Trim any excess 260Qs.
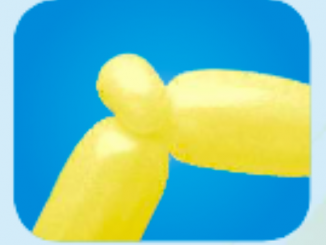
HOW TO:
Stretchy® Balloon Tape – Making a Connection Point
1. Remove all air from a
260Q latex balloon so you
can work with a flat connection point.
2. Place the flat 260Q on the Microfoil®or Bubble BalloonTM with the centre in the position where you need the connection point to be created.
3. Cut a 1.5″ (4cm) strip of Stretchy Balloon Tape, peel off the backing paper and stick securely across the flat 260Q, horizontal to the 260Q.
4. Cut two smaller strips of Stretchy Balloon Tape, peel off the backing paper and stick over the ends
of the first piece of tape (creating an “H” shape) for extra strength.
5. The flat 260Q can now be used as a connection point in a variety of designs.