
Below are some easy to follow instructions and illustrations which I found useful when I was a beginner. I hope you find them of use too and that covering a cake in Royal Icing becomes as easy as spreading butter onto bread. As with most Sugarcraft skills all you need is a little patience and plenty of practice.
Courtesy of Jane from Imaginative Icing
www.pastrywiz.com/wedding/wedding17.htm
You will need the following equipment:
- A turn table
- straight edge
- palette knife
- side scraper
- sharp knife
- Cling film
- soft brush
- bowl of Royal Icing


-
- 1) Make sure your Royal Icing is not too stiff or too sloppy, is in a suitable bowl and readily to hand.
2) Place your marzipan covered cake to be iced centrally onto the turn table.
3) Using the palette knife put a large dollop of icing onto the top of the cake and cover the remainder of the icing with the cling film to stop it from drying out.
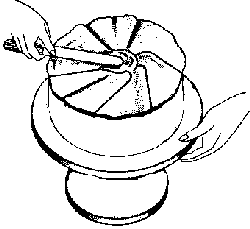 4) Still using the palette knife, spread the dollop of icing evenly over the top only. Now paddle down the icing for a few moments using a backwards and forwards movement, turning the cake on the turntable as you go.(see picture on left) The paddling displaces any unwanted air bubbles from the icing. At this point don’t worry about any icing spilling over the edges…unless of course it is a flood then do scrape up the torrent. Give the palette knife a clean.
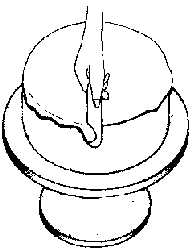
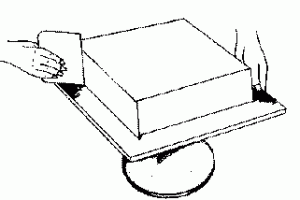
 5) Using the straight edge, Holding it at the two ends start at the furthest edge away from you….at an angle of 45 degrees to the surface, draw it across the cake towards your body in one continuous movement, making sure not to press down too hard. (see picture)
Return any icing collected on the straight edge back to the bowl. If you are unhappy with your first attempt scrape off and start again, you can do this as many times as you like whilst the icing is still wet and not crusting, about five minutes max. As long as the first coat is level you’re doing fine so far. Clean the straight edge after each attempt.
 6) Using the palette knife, remove any icing from the sides of the cake but don’t return it to the bowl if it has become crusty.(see picture)
7) Leave in a dry atmosphere to harden. The top should be dry enough after two hours to enable icing to be applied to the sides. It is possible to ice the top and sides together, but it is easier to do them one at a time when starting out.
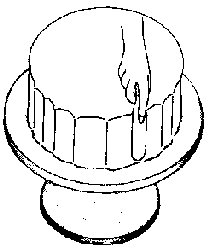 8) Make sure the cake is in the center of the turntable. Using the palette knife spread icing onto the sides. Paddle the icing as before turning the cake as you go.(see picture) Clean the knife
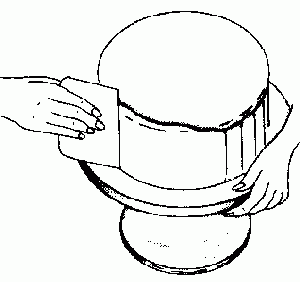 9) Using the side scraper, Hold the scraper at a slight angle (about 15 degrees) against the cake side, with your other hand take hold of the board/turntable at the back of the cake near the scraper. Slowly, but without stopping, revolve the cake until a circle has been completed.(see picture) When the entire surface is smooth, lift the scraper away from the side. This will leave a take-off mark which initially will be very pronounced. With practice and after further coats of icing this mark will be less noticeable. If you are unhappy with your first attempt then re-paddle and have another go. When finished clean the scraper.
10) Using the palette knife, remove any surplus icing which has crept over the top edge of the cake. Do not return this icing to the bowl it will have dry icing in it. Clean off any icing left on the board and clean the palette knife.
11) Leave the cake in a dry atmosphere to harden overnight then start all over again the next day. Store the remaining icing in an airtight container for later use. Two coats are absolutely necessary a third is recommended. If you are a beginner you may find that four or even five coats are needed before a satisfactory finish is obtained….don’t despair though a little practice and you soon get your icing legs.
12) Before adding the second layer of icing make sure the first is dry. Remove any rough edges and the take-off line with the aid of the sharp knife. Use the soft brush to remove any loose particles of icing which could spoil the next coat of icing. The icing used for the second covering should be slightly softer than the first. Icing from the previous day should be of the correct consistency needed, it will need a stir before use though.
13) The third or final coat of icing, softer still than the previous coats, about the consistency of slightly whipped cream. The final coat is applied in exactly the same way as before, but with a little more pressure added when using the straight edge and the side scraper. Most of the icing is taken off the cake, leaving a thin, smooth film of icing.
 Tip: If you are icing a square cake the sides are coated individually
Source & Images:
www.pastrywiz.com/wedding/wedding17.htm
